June Wedding Gift Ideas
June seems to be a good month for weddings. I don't know who or when
or where someone thought that was a good idea but they were obviously
not from Texas. They were obviously not familiar with the heat and
humidity that June brings. The crazy part is that June is the first
month of summer. Can you imagine what July and August are like for us?
So if you're planning on having a wedding in June (or summer for that
matter) just please, for the sake of everyone involved, don't.
Rant over.
It helps you deal with the heat though when you love unconditionally the people who are getting married. My sister got married this month, and I also attended a bridal shower for a dear friend who is getting married to her best friend in August. They've been best friends since high school! As I'm not really great at buying presents, I ended up making gifts for both women.

PALLET QUOTE ART
My sister and her now husband had a quote that they really liked: "Don't go through life, grow through life." She and my dad built a pallet wood canvas, and she turned it over to me to come up with the design using that quote. I found an image of a tree on Pinterest that someone had painted onto a pallet wood canvas and did my best to imitate it. I did draw VERY lightly it in pencil first.

Then I opened up a
Word document and played around with different fonts. As you can see
there are four different boards or levels to this so I made sure that I
did the same in the Word document so I could see the ratios and word
placement. It basically just gives me a visual of what the layout could
look like before I start painting. I'm really good at copying fonts
without having to trace it first too so I just needed to see it. I mixed
up some navy blue paint using blue and brown. I had to do a couple of
coats but acrylic dries pretty fast so I didn't have to wait long. If I
had to do it over again, I would make sure that I left enough room on
the 2nd and 4th lines because I had to squeeze "life" in there, and it
looks pretty obvious. But I don't think anyone but me notices haha Curse
my perfectionist tendencies!!!

Then I sprayed it with a clear coat of spray paint to protect and make it shine. It smelled a little bit so I left it in my parents' garage so she could pick it up whenever they left.
INITIAL BLOCKS
For my friend, I got her shower invite like a few days before so I didn't have time to really plan anything but thankfully I have all kinds of things around the house to make artwork. I decided to use these unfinished wood plaques I picked up at my last job. I have used them for other projects here and there. I will be sad when my supply has run out because they have been very helpful.
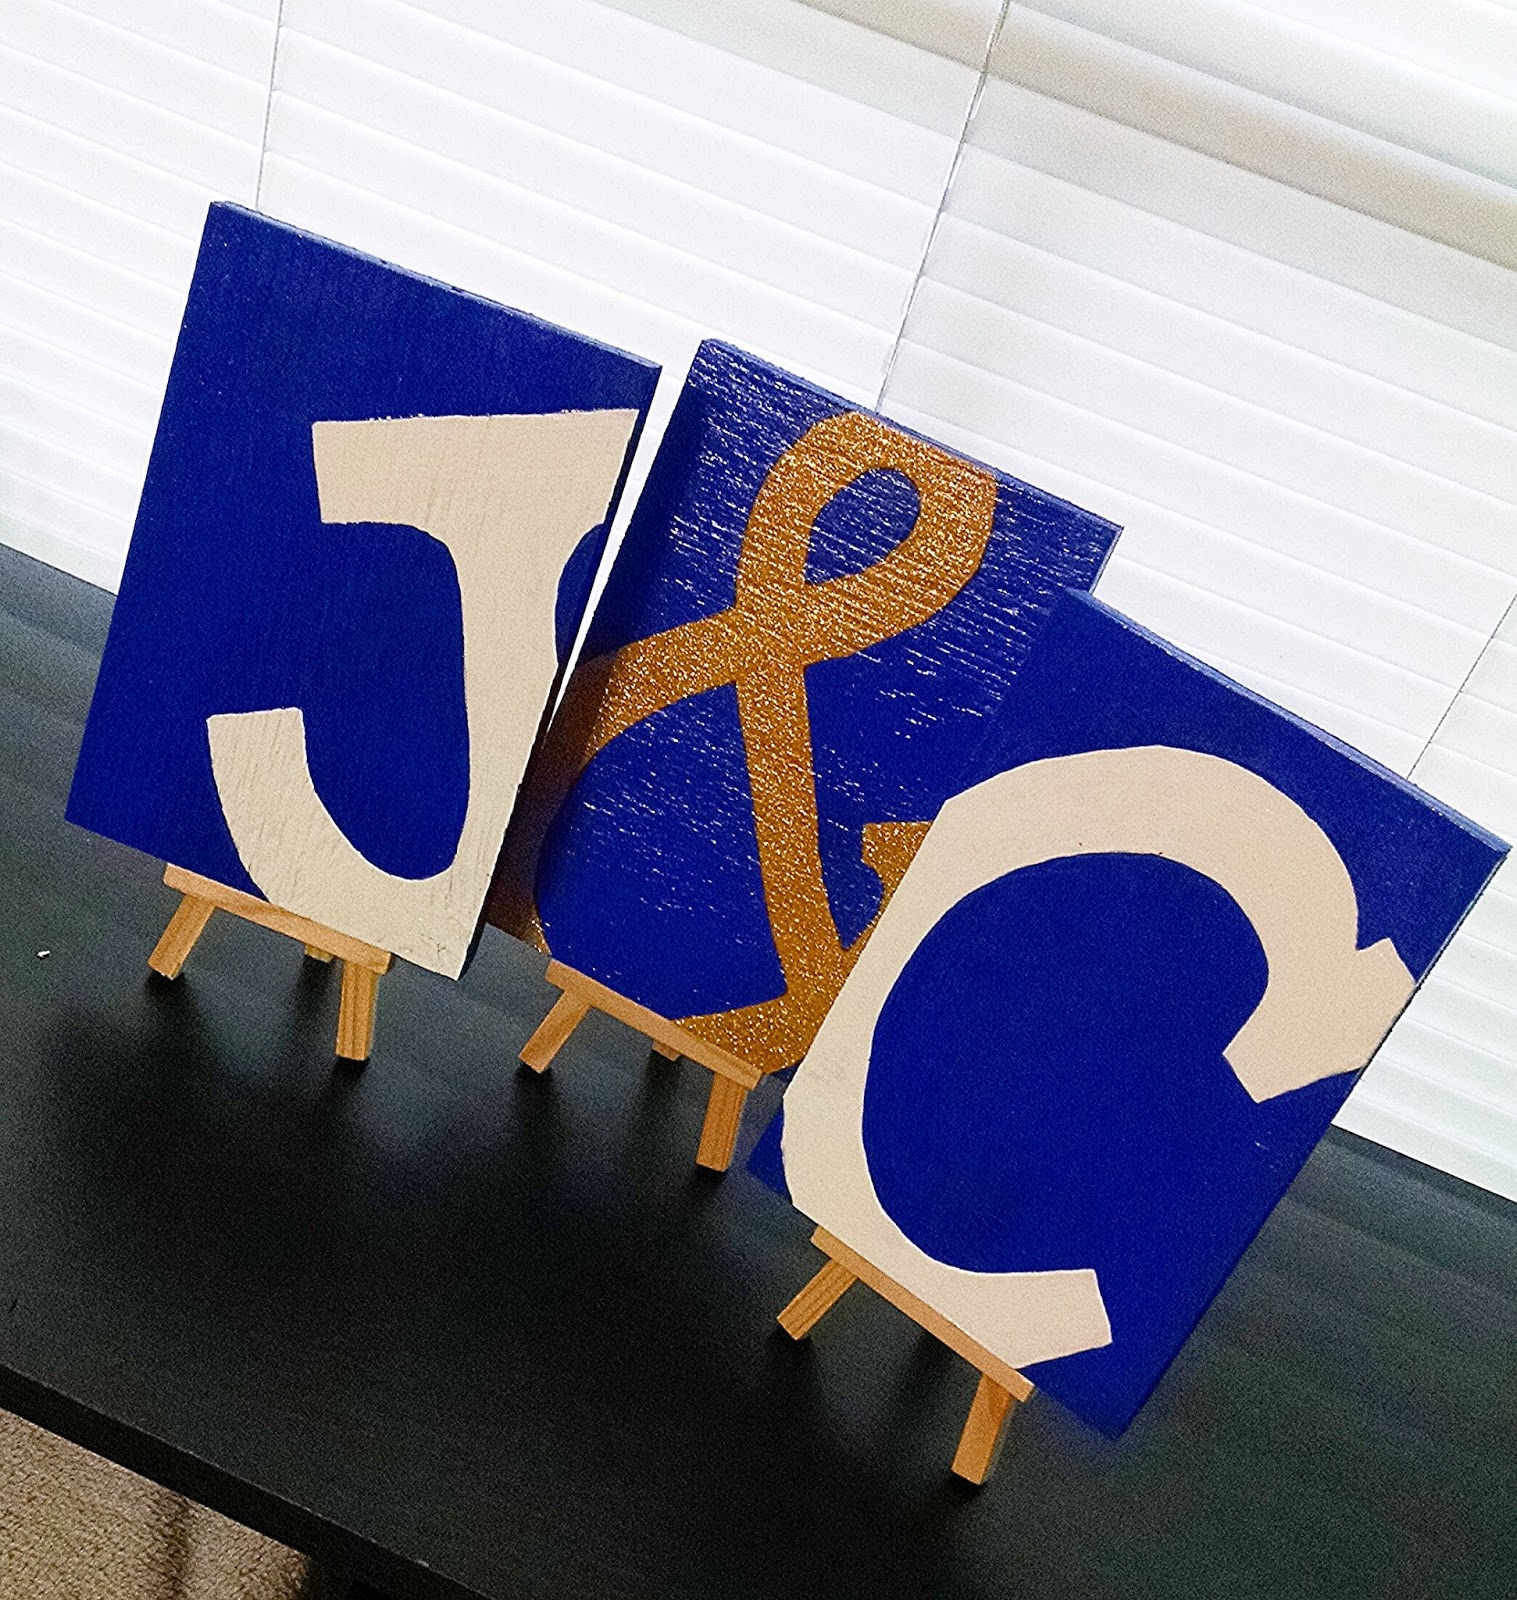
I sketched out some ideas so I knew what I was doing beforehand. I'm a planner especially in my projects because then that just makes the actual process go by fairly easily and quickly. In my sketches, I try to show the values (dark and light) so that I know how it will look when I pick out paint colors. I learned this in an art class in college, and it has been a very helpful skill to me. I also don't spend a lot of time on the sketches, and I don't make them perfect. I use pen because it's darker, and it makes me make less mistakes as well. Then I continue to make changes as I start working on the project. You'll see I incorporate ideas from different sketches in the final project so the final doesn't look like any one of the sketches specifically. I wanted to do their initials with the "and" sign in between, and I liked the look of having the letters expand outside the border of the plaque. I also looked at some of her Pinterest boards to get an idea of what colors she generally liked and decided on a blue background, the lettering would be white, and the "and" sign (officially named ampersand) would be gold.

To begin, I traced the outline of the plaque so I would know where the boundaries would be.

My next step was to paint the backs and edges of the plaques. that way whenever I get ready to start painting, the back sides will already be dry. I just squirted the paint directly onto the board.


Then I drew the letters and the ampersand free hand, and made it bigger than the actual plaque but making sure enough was inside so you could still tell what it was. I went ahead and drew a complete letter instead of only the parts that would be inside my boundaries. If you're not comfortable doing it free handed, you could also type it on a Word document and print it out. Or use stencils if you happen to have them lying around.

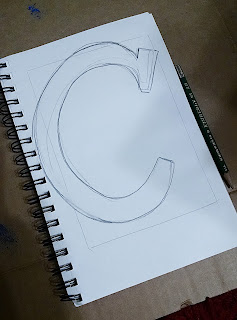
Then I cut out the complete letters. I used an exacto knife on some parts of the ampersand.

Next, I traced them onto the plaque. Make sure the back paint is dry of course. :)


Then paint the letters. When I do this project again, I'll make the letters a little more thicker so that there is a more even amount of background (blue) and foreground (white).

For the ampersand, since I wanted this to be gold, I painted it yellow first to give it a more solid background. When you buy glitter paint, it's a clear color with glitter in it. I knew I would have to paint multiple layers in order to get a solid look. The yellow base helps to give it a more solid look.

You'll have to do multiple layers of the glitter paint so you might actually want to paint the ampersand in yellow first to give it time to dry before you add the glitter. While it's drying you can paint the other letters. You'll have to do multiple layers of white too but the cool thing about acrylic paint is that it dries fairly quickly so when you're done with one letter you can go to another one, and while it's drying you're working on other letters. I had to get a good angle so you can see how shiny it turned out! It looks awesome against that blue. I love it!

Let them dry awhile because even though acrylic dries fast, if it's humid or warm, multiple layers of paint could take a little longer to dry. I broke down a cardboard box and used that as my work area. It was easier to move the letters outside for the last step when I have to spray them. I just scooted the cardboard outside!

So you'll need to get a sealer and gloss spray can. You can buy them so that you get both in one can. Make sure you spray outside and spray evenly. It might look dull at first or cloudy but once it's dried it should be clear and shiny. Let this dry overnight and in a cool place. If it's warm, they won't dry as fast, and they'll end up sticky feeling until they dry completely. Since it's still a little warm and humid at night here, before I went to bed, I brought them into the living room, turned the ceiling fan on high, and laid the letters underneath it so that might have helped a little.

And there they are!


I woke up a little early before the bridal shower, and ran to the craft store to buy some clear stands for them because these don't stand up very well by themselves (the ones in the pictures are mine from my house). I must say, that I was nervous when I showed up to this bridal shower because there were a lot of high class women there who could afford to go shopping at places I've never even been but my friend and many other people commented on how beautiful they were! I'm a firm believer that homemade gifts that come from the heart are almost always better than store bought gifts. I'm just really terrible at buying gifts so maybe that's why I feel that way :) Anyway, good luck and have fun!
Rant over.
It helps you deal with the heat though when you love unconditionally the people who are getting married. My sister got married this month, and I also attended a bridal shower for a dear friend who is getting married to her best friend in August. They've been best friends since high school! As I'm not really great at buying presents, I ended up making gifts for both women.

PALLET QUOTE ART
My sister and her now husband had a quote that they really liked: "Don't go through life, grow through life." She and my dad built a pallet wood canvas, and she turned it over to me to come up with the design using that quote. I found an image of a tree on Pinterest that someone had painted onto a pallet wood canvas and did my best to imitate it. I did draw VERY lightly it in pencil first.


Then I sprayed it with a clear coat of spray paint to protect and make it shine. It smelled a little bit so I left it in my parents' garage so she could pick it up whenever they left.
INITIAL BLOCKS
For my friend, I got her shower invite like a few days before so I didn't have time to really plan anything but thankfully I have all kinds of things around the house to make artwork. I decided to use these unfinished wood plaques I picked up at my last job. I have used them for other projects here and there. I will be sad when my supply has run out because they have been very helpful.
I sketched out some ideas so I knew what I was doing beforehand. I'm a planner especially in my projects because then that just makes the actual process go by fairly easily and quickly. In my sketches, I try to show the values (dark and light) so that I know how it will look when I pick out paint colors. I learned this in an art class in college, and it has been a very helpful skill to me. I also don't spend a lot of time on the sketches, and I don't make them perfect. I use pen because it's darker, and it makes me make less mistakes as well. Then I continue to make changes as I start working on the project. You'll see I incorporate ideas from different sketches in the final project so the final doesn't look like any one of the sketches specifically. I wanted to do their initials with the "and" sign in between, and I liked the look of having the letters expand outside the border of the plaque. I also looked at some of her Pinterest boards to get an idea of what colors she generally liked and decided on a blue background, the lettering would be white, and the "and" sign (officially named ampersand) would be gold.

To begin, I traced the outline of the plaque so I would know where the boundaries would be.

My next step was to paint the backs and edges of the plaques. that way whenever I get ready to start painting, the back sides will already be dry. I just squirted the paint directly onto the board.


Then I drew the letters and the ampersand free hand, and made it bigger than the actual plaque but making sure enough was inside so you could still tell what it was. I went ahead and drew a complete letter instead of only the parts that would be inside my boundaries. If you're not comfortable doing it free handed, you could also type it on a Word document and print it out. Or use stencils if you happen to have them lying around.


Then I cut out the complete letters. I used an exacto knife on some parts of the ampersand.

Next, I traced them onto the plaque. Make sure the back paint is dry of course. :)


Then paint the letters. When I do this project again, I'll make the letters a little more thicker so that there is a more even amount of background (blue) and foreground (white).

For the ampersand, since I wanted this to be gold, I painted it yellow first to give it a more solid background. When you buy glitter paint, it's a clear color with glitter in it. I knew I would have to paint multiple layers in order to get a solid look. The yellow base helps to give it a more solid look.

You'll have to do multiple layers of the glitter paint so you might actually want to paint the ampersand in yellow first to give it time to dry before you add the glitter. While it's drying you can paint the other letters. You'll have to do multiple layers of white too but the cool thing about acrylic paint is that it dries fairly quickly so when you're done with one letter you can go to another one, and while it's drying you're working on other letters. I had to get a good angle so you can see how shiny it turned out! It looks awesome against that blue. I love it!

Let them dry awhile because even though acrylic dries fast, if it's humid or warm, multiple layers of paint could take a little longer to dry. I broke down a cardboard box and used that as my work area. It was easier to move the letters outside for the last step when I have to spray them. I just scooted the cardboard outside!

So you'll need to get a sealer and gloss spray can. You can buy them so that you get both in one can. Make sure you spray outside and spray evenly. It might look dull at first or cloudy but once it's dried it should be clear and shiny. Let this dry overnight and in a cool place. If it's warm, they won't dry as fast, and they'll end up sticky feeling until they dry completely. Since it's still a little warm and humid at night here, before I went to bed, I brought them into the living room, turned the ceiling fan on high, and laid the letters underneath it so that might have helped a little.

And there they are!


I woke up a little early before the bridal shower, and ran to the craft store to buy some clear stands for them because these don't stand up very well by themselves (the ones in the pictures are mine from my house). I must say, that I was nervous when I showed up to this bridal shower because there were a lot of high class women there who could afford to go shopping at places I've never even been but my friend and many other people commented on how beautiful they were! I'm a firm believer that homemade gifts that come from the heart are almost always better than store bought gifts. I'm just really terrible at buying gifts so maybe that's why I feel that way :) Anyway, good luck and have fun!


Comments
Post a Comment